
In today’s digital world, repetitive tasks can slow down productivity and consume valuable time. Whether you are clicking repeatedly in a game, refreshing pages, or performing routine tasks on your computer, doing everything manually can be exhausting.
This is where automation tools like Auto Clicker come into play. They help users perform repetitive clicking tasks automatically, saving both time and effort. With the right setup, even beginners can use these tools effectively.
In this guide, we will walk you through everything you need to know about easy automation with Auto Clicker, from the basics to setting it up step by step for efficient automation.
Table of Contents
What is an Auto Clicker?
An Auto Clicker is a software tool that automates mouse clicks. Instead of physically pressing the mouse button repeatedly, the tool performs clicks for you at a set interval. It can simulate left-clicks, right-clicks, or even double-clicks based on your settings.
Auto clickers are widely used in gaming, data entry, software testing, and even for simple daily computer tasks. The main goal is to reduce manual effort and increase efficiency. With easy automation with Auto Clicker, users can streamline repetitive processes without needing advanced technical skills.
Why Use an Auto Clicker?
There are several reasons why people choose to use auto clickers:
- Saves time on repetitive tasks
- Reduces physical strain on fingers and hands
- Improves accuracy and consistency
- Boosts productivity
- Useful for both beginners and professionals
When you implement easy automation with Auto Clicker, you can focus on more important tasks while the tool handles the repetitive work.
Types of Auto Clickers
Before you start, it’s important to understand the different types of auto clickers available:
1. Fixed Interval Clickers
These clicks occur at a constant time interval (e.g., every 1 second).
2. Dynamic Clickers
These allow variable intervals and more customization.
3. Script-Based Clickers
Advanced tools that use scripts for complex automation.
Choosing the right type is essential for achieving easy automation with Auto Clicker based on your needs.
Step-by-Step Guide to Using an Auto Clicker
Let’s dive into the practical steps to set up and use an auto clicker effectively.
Step 1: Choose the Right Auto Clicker Tool
Start by selecting a reliable Auto Clicker software. There are many free and paid options available online. Look for features like:
- User-friendly interface
- Customizable click intervals
- Hotkey support
- Safe and virus-free
Picking the right tool is the first step toward easy automation with Auto Clicker.
Step 2: Install the Software
Download the Auto Clicker from a trusted source and install it on your computer. The installation process is usually simple:
- Download the setup file.
- Run the installer.
- Follow on-screen instructions.
- Launch the application.
Once installed, you’re ready to begin your journey with easy automation with Auto Clicker.
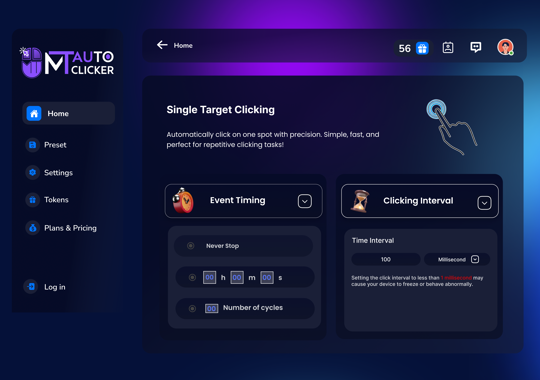
Step 3: Configure Click Settings
After opening the tool, configure the basic settings:
- Select click type (left, right, or middle)
- Set click interval (milliseconds, seconds, etc.)
- Choose single or double click.
These settings determine how your automation will work. Proper configuration ensures smooth easy automation with Auto Clicker.
Step 4: Set Click Location
You can choose where the clicks should happen:
- Fixed position (specific screen coordinates)
- Cursor location (where your mouse is)
For tasks like gaming or form-filling, setting a fixed position can improve accuracy and efficiency.
Step 5: Assign Hotkeys
Most auto clickers let you start and stop clicking with keyboard shortcuts. Assign a hotkey that is easy to remember, such as:
- F6 to start
- F7 to stop
Hotkeys make controlling the tool quick and convenient, enhancing your easy automation with Auto Clicker experience.
Step 6: Test the Auto Clicker
Before using it for important tasks, test the tool:
- Run it on a simple application.
- Check if clicks are happening correctly.
- Adjust settings if needed.
Testing ensures everything works smoothly and avoids errors during actual use.
Step 7: Run Your Automation
Now you’re ready to use the auto clicker for your tasks. Simply:
- Position your cursor.
- Press the start hotkey.
- Let the tool perform the clicks.
With this, you have successfully achieved easy automation with Auto Clicker.
Best Use Cases for Auto Clickers

Auto clickers can be used in various scenarios:
- Gaming: They help automate repetitive actions, such as collecting resources or clicking in idle games.
- Data Entry: Useful for repetitive form submissions or clicking tasks.
- Software Testing: Simulates user clicks for testing applications.
- Online Tasks: Refreshing pages, clicking ads (where permitted), or navigating repetitive workflows.
These examples show how easy automation with Auto Clicker can be applied in real-life situations.
Tips for Effective Use
To get the best results, keep these tips in mind:
- Use moderate click speeds to avoid system lag.
- Avoid overusing in restricted platforms.
- Always use trusted software.
- Customize settings based on your task.
- Monitor performance regularly.
Following these tips will improve your easy automation with Auto Clicker experience.
Common Mistakes to Avoid
Many beginners make simple mistakes when using auto clickers:
- Setting extremely fast click intervals
- Not testing before use
- Using platforms that prohibit automation
- Ignoring security risks
Avoiding these mistakes ensures safe and efficient easy automation with Auto Clicker.
Is It Safe to Use an Auto Clicker?
Yes, auto clickers are generally safe if you download them from trusted sources. However, you should always:
- Avoid suspicious websites
- Check for malware
- Follow platform rules
Using the tool responsibly is key to maintaining easy automation with Auto Clicker without risks.
Advantages of Auto Clicker Automation
Here are some key benefits:
- Saves significant time
- Reduces manual workload
- Improves efficiency
- Easy to learn and use
- Works across multiple applications
These advantages make easy automation with Auto Clicker a valuable solution for many users.
Limitations of Auto Clickers
Despite their benefits, auto clickers have some limitations:
- Limited to clicking tasks
- Cannot handle complex workflows
- May not be allowed on some platforms
Understanding these limitations helps you decide when to use easy automation with Auto Clicker and when to consider other tools.
Conclusion
Auto clickers are powerful tools for automating repetitive clicking tasks and improving productivity. With a simple setup and easy-to-use features, they are perfect for both beginners and advanced users.
By following this step-by-step guide, you can quickly learn to configure and use an auto clicker effectively. The concept of easy automation with Auto Clicker highlights how simple tools can make a big difference in daily tasks.
Whether you’re using it for gaming, work, or personal use, the right approach will help you save time and effort while achieving better results.